Monday, September 22, 2014

Maryland Crab Cakes with a Mixed Green Salad with Citrus Vinaigrette


Although today marks the first day of fall, I wanted to share one of my favorite summertime meals that our family enjoys!  This weekend I was sharing with my sister about this great salad with this amazing dressing that we had found online at Allrecipes.com and have enjoyed several times over the summer- this is a perfect light meal with crusty bread that is easy to pull together and is delicious! 


Maryland Crab Cakes

Ingredients:
2 tablespoons olive oil
6 green onions, chopped
3/8 cup olive oil
1 (16 ounce) can canned crabmeat,
drained
1 egg
1 tablespoon mayonnaise
1 teaspoon dry mustard
8 ounces buttery round crackers,
crushed
1/2 teaspoon ground cayenne pepper
1 teaspoon garlic powder
1/4 teaspoon Old Bay Seasoning TM
salt to taste
ground black pepper to taste
1 cup panko (Japanese bread crumbs) or
regular dry bread crumbs
Directions:
1. Heat 2 tablespoons oil in a skillet over high heat. Saute green onions briefly until tender; cool slightly.
2. Combine crabmeat, sauteed green onions, egg, mayonnaise, dry mustard, crushed crackers, cayenne pepper, garlic powder, Old Bay seasoning, salt and pepper. Form into 1/2 inch thick patties. Coat the patties with bread crumbs.
3. Heat 1/2 cup oil in a skillet over medium high heat. Cook cakes until golden brown on each side. Drain briefly on paper towels and serve hot.


Old Bay Garlic Aioli


ingredients
2-3 Garlic cloves, minced
1 tsp Kosher Salt
½ c Mayonnaise
2 tsp Lemon Juice, fresh
1 Tbsp Olive Oil
2 tsp Old Bay Seasoning
¼ tsp Black Pepper
. *Adjust seasonings to taste

directions
On a cutting board finely mince garlic using a broad blade knife. Sprinkle with Kosher Salt and use the flat edge of the knife to create a garlic paste. Mix garlic mixture and mayonnaise with a whisk until well blended. Slowly add Olive Oil and Lemon Juice to mixture, whisking to make a smooth creamy consistency. Add Old Bay and Pepper and whisk again. (Adjust seasonings to personal taste) Serve over crab cakes. Store in air tight container for up to a week.

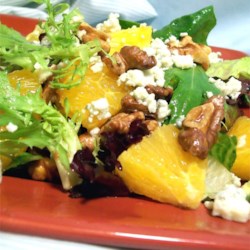
Orange, Walnut, Gorgonzola and Mixed Greens Salad with Fresh Citrus Vinaigrette
Ingredients:
3/4 cup walnut halves
10 ounces mixed salad greens with
arugula
2 large navel oranges, peeled and
sectioned
1/2 cup sliced red onion
1/4 cup olive oil
1/4 cup vegetable oil
2/3 cup orange juice
1/4 cup white sugar
2 tablespoons balsamic vinegar
2 teaspoons Dijon mustard
1/4 teaspoon dried oregano
1/4 teaspoon ground black pepper
1/4 cup crumbled Gorgonzola cheese
Directions:
1. Place the walnuts in a skillet over medium heat. Cook 5 minutes, stirring constantly, until lightly browned.
2. In a large bowl, toss the toasted walnuts, salad greens, oranges, and red onion.
3. In a large jar with a lid, mix the olive oil, vegetable oil, orange juice, sugar, vinegar, mustard, oregano, and pepper. Seal jar, and shake to mix.
4. Divide the salad greens mixture into individual servings. To serve, sprinkle with Gorgonzola cheese, and drizzle with the dressing mixture.                                                                                              This dressing is WONDERFUL as a marinade as well! 

Monday, September 15, 2014

Hot Pumpkin Hot White Chocolate

Shhh.... don't tell Starbucks but their pumpkin craze has NOTHING on this fall beverage!  Rich and creamy- it is perfect to serve on a cool fall evening around a fire, or with friends or just because!  A friend shared this recipe with me several years ago and it has become a tradition to make at least once before the hustle and bustle of the holidays!  Cheers!


Hot Pumpkin Hot White Chocolate

Ingredients:


  • 4 cups of milk 
  • 1 (15 oz.) can of pumpkin
  • 1 (14oz.) can of sweetened condensed milk 
  • 1 tsp. pumpkin pie spice 
  • 8 oz. of finely chopped white chocolate
  • 1 tsp. vanilla 
  • Garnish: whipped cream, pumpkin pie spice, cinnamon stick

Directions:

In a large pot, combine milk, pumpkin,condensed milk, pumpkin pie spice, chopped white chocolate and vanilla. Stirring frequently until chocolate is melted and mixed well. Ladle into mugs and Garnish.

Pumpkin Crunch Cake

The cool weather the last few days have really gotten me in the mood for all things fall- especially mouth watering desserts and drinks that feature the tastes of the season!  Today one of my friends asked that I share one of my favorite pumpkin recipes and I immediately thought of this cake!

As an Agriculture Teacher and FFA Advisor, fall also means that National Convention is just around the corner!  It is an amazing site to see 56,000 of our nation's best and brightest gather in their blue corduroy jackets- and the pride and enthusiasm they have for the agriculture industry!  Several years ago, while walking through the FFA Career Show, I picked up a handout from an Indiana Egg Cooperative that had the following recipe featured in it, and had to try it when I got home!  It was love at first bite!  I was so proud and excited that I made one to take to my Grandma (who is a wonderful cook and fabulous baker) who laughed and pulled out the same recipe from her recipe box that she had discovered the week before!  I hope that you and your family enjoy this easy dessert as much as we have!

 Pumpkin Crunch Cake

  1. 1 can Pumpkin Puree (15 ounce)
  2. 1 can Evaporated Milk (12 ounce)
  3. 4 Eggs
  4. 1 1/2 cups Sugar (white)
  5. 2 teaspoons Pumpkin Pie Spice
  6. 1 teaspoon Salt
  7. 1 pkg. Yellow Cake Mix (18.25 oz)
  8. 1 cup Chopped Pecans
  9. 1 cup Butter, melted
  10. 8 oz  Cool Whip
Instructions
  1. Preheat oven to 350 degrees and lightly grease a 9x13 baking pan.
  2. In a large bowl, combine pumpkin, evaporated milk, eggs, sugar, pumpkin pie spice and salt.  Mix well and spread into the prepared pan.
  3. Sprinkle dry cake mix over the top of the pumpkin mixture, and pat down.  Sprinkle with the chopped pecans evenly over the cake mix and drizzle with the melted butter.
  4. Bake 60-80 minutes, or until done.  Top with whipped topping when ready to serve. 
Makes 1 9x13 cake

Sunday, September 14, 2014

Carmel Apple Nut Pound Cake

There are so many great reasons to celebrate fall- with the harvest season upon us it's no wonder why so many family gatherings occur this time of year!  We recently celebrated my husbands great aunt's birthday with a potluck dinner and this was just the excuse I needed to pull out this great recipe! (Am I the only one who wants to impress their sweetie and his family of their culinary talents?)

This cake, from the Paula Deen magazine, is perfect for fall!  No one will ever guess the secret ingredient in this scrumptious cake :).  I will say there was more than enough icing to make two cakes- so you may want to cut the icing ingredients in half to keep a diabetic coma from occurring at the first bite ;) (This recipe is not friendly for those who suffer from sugar issues- and a little bit goes a long way so it's best to not make giant sized pieces :)). Hope you enjoy it as much as we do!
  1. 1 cup peeled, cored, and diced Granny Smith apple (about 1 large)
  2. 1 cup chopped walnuts
  3. 3 1⁄4 cups all-purpose flour, divided
  4. 2 cups butter, softened
  5. 2 cups sugar
  6. 6 large eggs, at room temperature
  7. 2 teaspoons vanilla extract, divided
  8. 1 (3.4-ounce) package instant butterscotch-flavored pudding mix
  9. 1 (10.75-ounce) can Campbell’s® Cheddar cheese soup
  10. 1 teaspoon baking powder
  11. 1⁄2 cup butter
  12. 2 cups firmly packed dark brown sugar
  13. 2 tablespoons heavy whipping cream
Instructions
  1. Preheat oven to 325°. Spray a 15-cup fluted pan with nonstick baking spray with flour.
  2. In a medium bowl, combine apples, walnuts, and 1⁄4 cup flour.
  3. In a large bowl, beat 2 cups butter and sugar at medium speed with an electric mixer until creamy. Reduce speed to low. Add eggs, one at a time, beating well after each addition. Increase speed to high, and add 1 teaspoon vanilla; beat for 2 to 3 minutes, or until mixture is fluffy. Reduce speed to low, and add pudding mix and soup; beat for 1 minute. Increase speed to medium, and beat for 1 minute longer.
  4. In a medium bowl, sift remaining 3 cups flour and baking powder together. Gradually add to butter mixture, and beat until mixture is well combined, about 2 to 3 minutes. Fold in apple mixture.
  5. Pour batter into prepared pan. Drop pan lightly on counter to release any air bubbles. Bake for 1 hour and 30 minutes, or until a wooden pick inserted in center comes out clean. Let cool in pan for 10 minutes. Remove from pan, and cool completely on a wire rack. Place wire rack over a large piece of aluminum foil.
  6. In a small saucepan, melt 1⁄2 cup butter over medium heat. Stir in dark brown sugar and remaining 1 teaspoon vanilla. Add cream, stirring constantly until combined. Pour mixture over cooled cake.
Makes 1 10-inch fluted cake

Fall is in the air!

Where has the last few weeks gone?  It seems like the first few weeks of school is always the hardest- striving to do the best in the classroom, trying to set a new routine, tweaking things for the new year and of course the exhaustion of getting back into the swing of things!  

We have been celebrating at our house as well!  The youngest just turned two and the oldest is getting ready to be four Friday!  We celebrated with family and friends with a joint birthday party last night- we did a Cars theme and had a great time!  (Although I am going to stay off Pinterest for their party next year, simple may be better ;)). 

This time of year marks another celebration and milestone in our family- the two year anniversary of the scariest moments of our married life as we almost lost our 9 day old baby- in someways I celebrate his survival more than his birth and am humbled by God's healing grace!  
(More on his story to come- I want to dedicate a post to how we see God each and every day!)

Okay- enough of the rambling but it is good to post again--- I promised a dear friend I would share a cake recipe, so be on the lookout for this knockout of a fall dessert!

Blessings!

Sunday, August 17, 2014

End of Summer...

It is hard to believe that the end of summer is almost here!  Where has time gone, didn't the students just walk across the floor at graduation and now its time to think about them getting back into the swing of things.  It seems like no matter how hard as teachers we try to plan ahead and organize to make our little domain's run smoothly it is always an adjustment in getting to know your new kids, preparing for your classes, making sure your room looks "just right" for that first day of school (clean-organized and if your me, hopefully a LITTLE bit of cuteness) and getting back into the routine of living by bells- bells that tell you when to start and stop teaching, when to go to lunch, when to run to make copies, and when to go to the bathroom... its amazing how we program ourselves to respond to the sound of those bells!

My fellow teachers come back to work this week.  It is amazing how your coworkers become extensions of your family and you look forward to seeing them and celebrating life with them!  I know our staff is excited and nervous as we have had a LOT of administrative changes this year and aren't quite for sure what to expect yet.  There is a total different feeling in our school than at the end of the year last year, an excitement for what will be and a slight fear because of the changes that have taken place in a short time.

As we gear up for the weeks to come- I wanted to share a project I have been working on to help those of you who are preparing to find that balance of work and home yet again, or those who have kids and a whole new set of things to learn for the next year.  I wanted to take a moment and share something that will hopefully help you for the next 3 months (if you choose to utilize them) or for when life is so busy you can't see straight (which happens more frequently this time of year).  Please take a moment to check out the link below which directs you to 11 weeks (as of right now) worth of menu plans and grocery lists that on average prepares between 5-7 dinners for your family, can feed a family of four for around $150 a week (some weeks are more, some are less depending on what you have in the freezer and pantry and if you buy in bulk when sales are on).  I hope that this helps take some of the burden off of you in the year to come- and I hope you enjoy a week (or eleven) off from the pressure of balancing school and home.

Taste of the Blue Ridge Weekly Meal Plans


May God bless you in the school year to come and may your students get to know Him through you and your actions.  Although every day is not going to be great, may we remember that we have one of the greatest careers on earth and can be an influence on the lives of youth within our community.  May we be a positive influence when they have none at home.  May we be a shoulder for them to lean on when life hands them lemons.  May we be there to celebrate their accomplishments.  May we provide a safe haven and environment so they may grow.  May we provide memories that last a lifetime.  And somewhere along the way- may we provide them lessons about life in addition to the curriculum(s) we teach.

With lots of love and blessings-  Momma P

Tuesday, August 5, 2014

More Biscuits Please...

We had an alumni meeting last night, which meant that we caught a quick bite to eat at a local restaurant before heading back to school.  Shortly after we sat down, the waitress brought over a basket of fresh, hot biscuits for us to nibble on while we waited for our meal and I was instantly taken back to my grandma's kitchen and watching her make biscuits for our family at every meal.

Grandma and Grandpa lived a simple life- and tenant farmed for most of my dad's childhood until their
children were old enough to go in together and purchase a small farm for their parents that was about 5
minutes from where I was raised.  The sense of duty and family ties was as thick as the blood that ran through their veins.  If any of dad's seven brothers or sisters or any of our cousins (there were thirteen of us total in our generation) came up- Grandma would call those of us who lived close by and want to have us over for lunch.  Grandma's table always had a a feast with some kind of meat, applesauce and cucumbers with green onions in vinegar and fresh biscuits among a variety of other veggies (most of which she raised in her garden).

Grandma always made her biscuits in the dinning room- she had a huge wooden bin that sat in the corner that she kept her flour stocked in.  She would measure it out, throw in the lard and work her magic in making biscuits for our family.  She always knew just when the dough was right and ready to be rolled out and cut (using a glass jar) without ever looking at a recipe.  In many ways, this reminded me of how she tended to us as a family, always knowing when to encourage us, support us and being the bond that tied us all together. Grandma loved her family fiercely and took pride not in what they had but in who they were.  It wasn't about the fancy things that could be bought but how we stuck together when we needed to.  

When my youngest asked for "more biscuits please" last night, I couldn't help but remember back to my childhood and watching my grandma make those mouthwatering biscuits and the love that she instilled in our family or the patience she had to get her dough "just right".  Grandma never took a short cut with a canned or frozen biscuit, preferring to use her hands to provide for our family.  I hope that this is a lesson I can teach my boys- that although sometimes it is easy to accept what is easiest as being "okay"- great things can be achieved when you use your hands to make something from scratch.  (Although I do cheat and use frozen biscuits more than I should)  I hope my boys will look back on their childhood as adults and have moments when they remember these "bites" from childhood.
Never Fail Biscuits

Ingredients:

  • 2 cups all-purpose flour
  • 1/2 teaspoon salt
  • 4 teaspoons baking powder
  • 1/2 teaspoon cream of tartar
  • 2 teaspoons white sugar
  • 1/2 cup butter, chilled and diced
  • 3/4 cup milk

Directions:
1.Preheat oven to 450 degrees F (230 degrees C).
2.In a large bowl, sift together dry ingredients. Cut in butter until mixture resembles coarse oatmeal. Make a well in the center of the dry mixture and pour in the milk. Stir until dough begins to pull together then turn out onto a lightly floured surface.
3.Press dough together and then roll out until 3/4 inch thick. Cut into 2 inch round biscuits and place on an ungreased baking sheet.
4.Bake in preheated oven for 10 minutes, or until golden.